Sunday, November 17, 2013

I Like Making Scenes!

On cards, that is!  This week's cue at CASology is:


I immediately thought of a Hero Arts/Studio Calico set (ST509) I got a couple of years ago that contains some fun banner images and decided to use them to create a CAS winter scene:


After stamping the banners and "trunks" with Hero Arts Green Hills shadow ink and Latte chalk ink on the base card the banners were stamped again on scrap cs, cut out and popped up for some dimension.  The polka dotted cloud from the same set was stamped using Hero Arts Soft Pool shadow ink.  I wanted to keep the "dotty" theme going so I used this cute sentiment from Hero Arts CL630 Miracle of the Holiday set :)
Other Supplies Used:  Papertrey ink white cs, Memento Lady Bug ink, Stampin' Up Pool Party baker's twine, Martha Stewart score board

And since I used a Hero Arts holiday sentiment stamp and another one of my fave techniques (using stamps to create a scene) I'm going to pop this into the current Hero Arts challenge :


Saturday, November 16, 2013

Hero Arts Holiday Challenge Take 2!

Took a break from making Thanksgiving cards to create another Christmas card using my fave technique of paper piecing for the current Hero Arts Holiday Challenge :


Decided to use this snowman again from Hero Arts CG109 Share the Joy set to make a happy couple:)


The sentiment from this same set was stamped and embossed horizontally instead of vertically and the last part of it ("of the season") was stamped on the inside.  The pp used to make their outfits is from Carta Bella Merry & Bright collection.  Snowflake is from HA set CL562.
Other Supplies Used:  WPlus 9 heart die, glossy accents (on heart), Martha Stewart baker's twine, Cuttlebug Christmas Stitches embossing folder(border)

Enjoy the weekend and thanks for taking the time to leave a comment!  

Friday, November 15, 2013

Do You "Ombre"?

Happy Friday!
I need to finish up Thanksgiving cards before I can really go all out with creating Christmas cards.  And admittedly it's been tough as we actually had SNOW the other day - ugh!  I decided to turn to the most recent issue of Paper Crafts Stamp It! mag for some inspiration.  I don't normally like to spend that much for a magazine - in fact even the woman who cashed me out at the store where I purchased it commented on how expensive it was!  But it's full of 66 different stamping challenges and I thought it would be fun to challenge myself as I work on holiday cards.

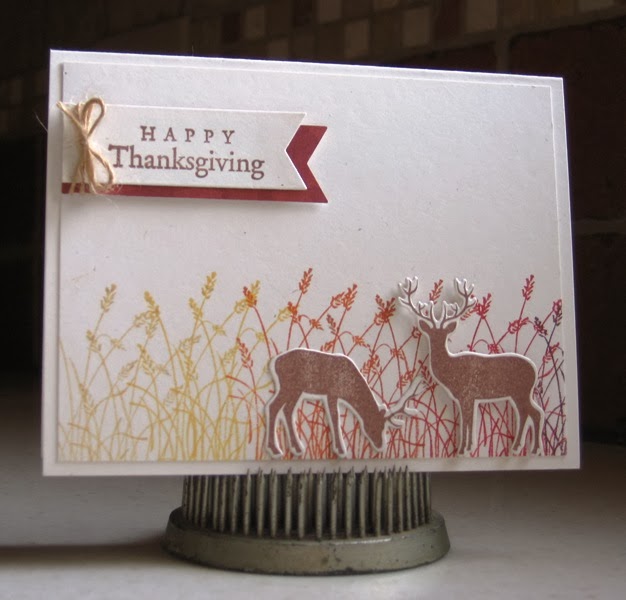
Under the color designs category one of the challenges is to create an ombre effect.  So I grabbed 6 Stampin' Up ink pads:  So Saffron, Daffodil Delight, Pumpkin Pie, Really Rust, Ruby Red and Bravo Burgundy and went to town:


The wheat image is from the Stampin' Up set Wetlands and the deer stamped in SU Close to Cocoa ink are from Papertrey Ink In the Meadow.  Sentiment is SU.
Other Supplies Used:  Papertrey ink rustic white cs, Creative Impressions twine, MFT banner die, DCWV pp, gelly roll pen

Since this fits the current challenge themes of  both Simon Says Stamp Monday and Wednesday Challenge Blogs I'm going to pop this into their pools.  Hope you all have a creative weekend!

Thursday, November 14, 2013

SSS Wednesday Challenge Blog: Thanks/Thanksgiving

Just a quick post before I head out to work this morning.  This week's challenge at the Simon Says Stamp Wednesday Challenge Blog is Thanks/Thanksgiving and they are featuring Hero Arts products.  Believe it or not I actually don't own any Hero Arts Thanksgiving-specific stamps!!  But I pulled out an old fave Real Blossom (K5414), some leaf stamps from an ancient Stampin' Up set and some Ranger distress ink markers in autumnal colors to create my card:


And I swear I had already coated my "thankful" die cut (from Stampin' Up/Sizzix set) with glossy accents before I saw this on Nichole Heady's blog!  Partial sentiment is from Hero Arts set Everyday Sayings.
Other Supplies Used:  Papertrey ink rustic white cs, Stampin' Up soft suede cs and marker, JoAnn's white sequins, W R Memory Keepers corner rounder

Thanks for all your sweet comments!  I'll be checking out everyone's blogs later today:)


Friday, November 8, 2013

Hero Arts Holiday Challenge: A Few of My Favorite Things!

It's been too long since I participated in a Hero Arts challenge:


One of the challenge themes is "A Few of My Favorite Things" - use at least one HA Holiday stamp along with a fave technique to create a Christmas/Holiday/Winter card.

I'd have to say one of my fave techniques is still paper piecing and I pulled out an oldie but goodie HA snowman from CG109 Share the Joy cling set and some patterned paper from Echo Park "This & That" collection to create a Christmas card:


Did a little tone-on-tone stamping using HA CG359 Stitched Greetings bg stamp with Stampin' Up old olive ink on a piece of old olive cs.  Sentiment is from HA CL540 Christmas Reindeer set.
Other Materials Used:  MFT banner die, Creative Impressions twine, pom pom from stash

Thanks for all your supportive comments!


Wednesday, November 6, 2013

Dynamic Duos # 77 "Bold & Cheery Week"!

When I saw the current challenge colors at Dynamic Duos I was finally inspired to create a Christmas card:

Every year I set up a card table in my craft room and pile it high with all my Christmas card related stampin' supplies - the hubster has affectionately dubbed this "Christmas Central".  Having everything out in plain sight really gets me in the mood to make Christmas cards - of course the Christmas music playing in the background doesn't hurt either:)


I cracked open a Hero Arts background stamp called Stitched Greeting from 2011 that had never seen ink before!  After brayering it with Hero Arts Ocean dye ink I stamped it on a piece of Stampin' Up Bermuda Bay cs - love the tone-on-tone look.  After carefully masking the same stamp I inked it up with Stampin' Up Real Red ink and stamped the die cut banner with the stitched sentiment "Christmas".  I loooooove this Memory Box Leaping Deer die and isn't the font of this Stampin' Up/Sizzix Expressions die fun?!  Couldn't resist adding a little "Rudolph" nose:)
Other Supplies Used:  Basic Grey True Love pp, Papertrey ink rustic white cs, WPlus 9 banner die, Stampin' Up Real Red cs, Queen & Co gems and pearl, JoAnn's sequin

Thanks for all your feedback!

Sunday, November 3, 2013

SSS Monday Challenge: Anything Goes!

Happy Sunday!
Just realized the current theme at Simon Says Stamp Monday Challenge Blog is also Anything Goes.  I recently made a sign for my talented friend to use in her display at a craft show:


She is one of those people who has the uncanny ability to see the potential in "found" objects - both natural and man made.  The jewelry she creates from seaglass is awesome!

I started with a piece of  7" x 11" watercolor paper and embossed several shell images from the timeless Hero Arts set Antique Engravings.  Using a water brush and some Ranger distress inks I colored both the the shells and the background - adding a little shading around each shell image with a copic marker for depth.  After the panel dried I overstamped the whole piece with Hero Arts La Letter.  I wanted to simulate the translucent quality of seaglass so I added a text overlay of vellum on top of the panel.  The vellum overlay was punched with a scroll border as its shape reminded my of waves.  

Here's another pic of the sign:


She was able to slide the completed piece into a vintage metal sign holder.

Hope you enjoy the rest of your weekend!  I'm off to work today but plan to spend time catching up on everyone's blogs tomorrow:)

Thursday, October 31, 2013

I Want Candy!

Happy Halloween!
I know for many Halloween just isn't their "thing".  Besides having wonderful memories of creating Halloween costumes with my dad (one year I was a firecracker!!) it was 15 years ago today when my husband proposed to me:)  He actually put my ring in a Halloween treat bag!!  Since then I've always enjoyed putting together treat bags for the special goblins who come to our door.

And since the current challenge at Simon Says Stamp Wednesday Challenge blog is Anything Goes I thought I would share a pic of some of the bags I made this year.  Sorry the pic is a bit blurry but I just finished these up late last night and have to head out to work this morning :


I die cut some bread tags from a Cricut cartridge called Walk in My Garden from some Stampin' Up patterned paper I scored at a garage sale.  At the same sale I also picked up the cutest SU stamp set called Googly Ghouls - all of the images are tailor made to add googly eyes:)  I was also able to make use of some glitter stickers I've had in my stash forever (ghost and black cat)!  The die cut banner is from a Simon Says Stamp set called Tilted Banners and the sentiment is from the dollar bin at Michael's.  After tying on some clearance black satin ribbon to the filled candy bags it was so easy to add the finished bread tags.

Hope your day is filled with more treats than tricks!

Wednesday, October 23, 2013

CASology WK# 67: Country

Hello my crafty friends!

This week's challenge at CASology is:


So many directions to go in with this one but I chose to recreate a familiar scene this time of year in many farmer's fields:


Yep -  a couple of silly gooses:)  After brayering several Stampin' Up inks on a piece of white cs (using a circle die cut as a mask for the sun) I overstamped the sentiment, geese and wheat from the SU set "Wetlands" in SU early espresso ink.  Stamped the geese again on scrap white cs and added a little shading with a grey copic marker before cutting them out and paper piecing.  Panel was mounted to a SU early espresso card base.  May be difficult to see in the pic but I added a little sparkle to the wheat with a gelly roll pen.

I think my hubby will appreciate this one for his birthday as hunting has become a recent passion for him:)  As I type this I can actually smell goose meat being dehydrated into jerky!

Thanks for all your comments!


Sunday, October 20, 2013

I *Heart* Pumpkins!

I couldn't let this week's CASology challenge go by without participating:

I can't overstate how much I love 'em!  If something is made with a pumpkin I'm all over it!  Edy's limited edition pumpkin ice cream? Check!!  Bath & Body Works pumpkin caramel latte candle? Check!!  Pumpkin spice coffee?  Check!!

Awhile ago I scored the Cuttlebug Stitched Squares embossing folder set at Big Lots for two bucks and won the Stampin' Up set Button Buddies as a door prize.  I decided to use elements from both sets to create my card:


I've had the plaid pp in my stash forever.  Sentiment is from a cute Hero Arts Halloween woodblock set I picked up at a garage sale for 50 cents!  I plan to tuck this card into a care package we'll be sending to our youngest niece who is in her second year of college:)
Other Materials Used:  Stampin' Up early espresso, pumpkin pie and lucky limeade ink, Papertrey ink rustic white cs, orange raffia

The temps are starting to cool down here in the Northeast but I'm not complaining as this has been one of the better fall seasons we have enjoyed in the Finger Lakes.  And since this post is pumpkin oriented I just have to share pics of a recent lunch with my daytrippin' buddy Sue as the name of the restaurant happens to be Pumpkin Hill Bistro!!


No frost here yet so the flowers in the garden were still blooming:


The restaurant is as charming on the inside as it is on the outside:


And lunch wouldn't have been complete without a bowl of pumpkin bisque soup:) Could the mason jar water glass and little punkin' on the table be any cuter??!!


Last weekend I took my mom on an apple tasting tour and at each of the orchards we visited we were met with the sight of hundreds of pumpkins for sale:


And here's a pic of mom posing as a pumpkin - Hee! :


Happy Sunday and thanks for taking the time to comment!

Sunday, October 6, 2013

Paper Smooches Sparks Challenge: Anything Goes

I was really energized by WCMD yesterday and decided to revisit a Christmas card design and enter it in the current Paper Smooches Sparks Challenge: Anything Goes :


I think the font of this sentiment from the Paper Smooches Christmas Sampler set goes perfectly with my funky little mosaic tree:


I can't remember the last time I decoupaged something - grade school, maybe??!!  This technique was alot of fun and one I know I'll be trying again soon:)  I randomly cut different sized squares and rectangles from a package of Hero Arts foliage layering papers and adhered them to a PTI rustic white cs panel with Aleene's instant decoupage and then brushed the entire panel with a thin layer of decoupage.
Other Supplies Used: PTI tree die, Doodlebug Designs baker's twine

Thanks for all your lovely comments! 

Saturday, October 5, 2013

World Card Making Day!

Happy World Card Making Day!
For once I wasn't scheduled to work on World Card Making Day and I actually managed to complete a couple of cards:)  The current challenge at CASology caught my eye:


so I pulled out a couple of oldies but goodies and did some water coloring with my distress markers.


In my neck of the woods the harvesting of grapes eventually = WINE :)  After embossing this Holly Berry House grape image on a watercolor panel I colored it with distress markers (peeled paint, dusty concord and milled lavender) and an aqua brush.  After it dried I partially over stamped the grapes with Hero Arts La Lettre. Sentiment is from Papertrey Ink First Fruits set.
Other Supplies Used:  Papertrey Ink rustic white cs, natural twine

I've always loved cornucopias! What better way to represent the bounty of harvest time?  


This one is from a really old Stampin' Up set.  I did the same thing here as I did with the grape image.  I really wanted to frame it but also keep the design more CAS so I decided to die cut the frame from the same PTI rustic white cs as the card base.  Sentiment is also from PTI First Fruits set.
Other Supplies Used:  Stampin' Up woodgrain embossing folder, orange raffia

This was definitely ALOT more fun than cleaning the house - too bad we can't have a World Card Making Day once a month:)

Tuesday, October 1, 2013

SSS Anything Goes Challenge and Fall in the Finger Lakes

Hello Friends!
I am firmly planted in the autumn season right now and lovin' every minute of it:)  However, it occurred to me the other day I'm waaaaaaay behind in making Christmas cards - I usually have at least half a dozen done by now!

Since the current Simon Says Stamp Wednesday Challenge is Anything Goes I thought I would take a crack at getting started:


I first adhered lengths of three different shades of green sequins to a piece of green cs and attached that to the card base.  Then using a Papertrey Ink tree die I made a negative space panel.  Sentiment is from Paper Smooches.  I added a few score lines above and below the sentiment for some interest.  

Thought I would share some pics of the beautiful autumn scenery we are enjoying here in the Finger Lakes!  Here is my co-worker Janet and I posing in front of one of the area's many vineyards:

And here's a better shot of Seneca Lake that you can barely see in the horizon of the pic above.  The leaves on the trees are juuuust beginning to change:


And what better way to enjoy all this beauty than by sharing a bottle of Finger Lakes wine??!!!:


Discovered a new walking trail at a nearby wetlands preserve!  It's flat enough so I can take my 80 year old mom along:)


The trail is flanked by meadows and the wildflowers are so vibrant!


And how did nature know to place flowers in a color opposite on the color wheel to the color of the orange trail sign:)


Hope you enjoy a little beauty in your day!  Thanks for all your lovely comments!

Wednesday, September 25, 2013

You Knock My Socks Off!

Happy Hump Day!

Just a quick share today as hubby and I are headed out to celebrate our wedding anniversary!  No specific plan - just going to get out and enjoy a beautiful, sunny autumn day in the Finger Lakes:)

Here is the card I made for him using some of the images from a fave Lawn Fawn set "My Silly Valentine":


I am such a sucker for for any images that animate inanimate things:)
Supplies Used:  Cuttlebug embossing folder, WPlus 9 Heart Stackers dies, Martha Stewart bakers twine, Stampin' Up pp and grey cs, Papertrey ink white cs, copic marker

And since I kind of used a monochromatic color scheme I'm going to pop this into the current Lawnscaping Challenge #66: Monochromatic.


Thanks for your encouraging comments!

Sunday, September 22, 2013

May Sprinkles Rest in Peace and a Card Workshop

Happy Sunday!
I've got some pics of some cards I made at a workshop last Thursday at the end of this post but first I just have to share an amazing experience I had this week!  This past spring I had the opportunity to reconnect with a cousin (on my mom's side) who has passionately pursued the family's genealogy.  In the course of our conversation Charlene mentioned an old family cemetery in the area she recently tracked down and suggested my mom and I do the same.  Hmmmmm, not really my "thing" but I dutifully pocketed the hand drawn map she handed to me and then promptly forgot all about it......

I came across that map a few weeks ago and in conversation idly asked my mom if she would be interested in spending a day "doing lunch and a cemetery".  Of course she would!  Soooooo, this past Wednesday armed with the map we set off on our adventure!  

We soon realized my cousin's map left ALOT to be desired and decided a trip to the county clerk's office was in order.  In their book of county cemeteries we found out "our" cemetery - barely visible from the highway - is in a clump of trees and carpeted with myrtle.  The fence no longer exists but the stone gateposts still remain. AND, you can only access it from a private driveway....Whaaaat???!!!  

So after driving down the 5th private driveway (and worrying the neighbors were going to report a suspicious prowler to the police!) my mother excitedly shouted "Stop the car!!!!":


Clump of trees - Check!!!  A carpet of myrtle - Check!!!  This had to be it!!!  So I told my mom to wait in the car while I got a closer look to see if this indeed was the cemetery we'd been searching for:


Ahem, NOT ex-act-ly....... But after a loooong bout of gut-busting laughter I happened to glance beyond the headstone of the dearly departed Sprinkles and this is what I saw:


Could it be the remaining stone gateposts of the cemetery just yards away???!!!!  My heart was pounding in my chest as I stumbled through the brush!!  And I still get the chills when I look at the first visible headstone I came upon:


For Charles Angus was the brother of John Angus who fathered Jane Angus.  And Jane Angus was my great, great grandmother!!!!
Many of the headstones were still visible.  There was the stone of Phebe, wife of Walter Angus (Walter emigrated from Scotland in 1793 and owned hundreds of acres of land in the area):


And Penelope was the mother of Phebe:


Some were not so easy to read:


And here's my mom reading the stone of Jane Isabella Angus Simons, a niece of Walter Angus.  It appears one of her descendants erected a newer stone to honor her gravesite -she died in 1846:


Mom turned 80 this past summer and I'm really glad I made the time to do this.  It's a shared experience I will always treasure.

And here's some cards I created at a Stampin' Up workshop I attended.  What I love about these workshops is the chance to work with some of the new products without having to buy all of them:)
My CAS blogging buddies will be so proud of this one-layer card!:


And here's the same stamp on a card with all the elements I love like polka dots, embossing, die cutting, windows and dimension:)


Now here's two cards using the same stamps and similar designs.  One is more masculine:


And here is the feminine version:


And here's a fun Halloween card:)


Thanks for making it through my wordy and picture heavy post!  Have a great week!